HowTo: How to Add Users via Google Workspace Sync on the Power Platform
Adding users to CyberHoot’s Power Platforms via Google Workspace Sync
If your company uses Google Workspace, you can use it as a simple and effective way to manage users within CyberHoot. Follow the steps below:
Instructions for Power platform:
- Upon login, you will find yourself on the Dashboard screen. Click on “Users” or “Admin” then “User-Group-Manager” on the top right of the screen.
- Click on the “Google Sync” button.
- Click on “Google Settings“.
- Click on “Grant Google Access”.
- Enter the Google credentials and click on Allow.
- Click on Next to go to Google Users & Groups.
- Select whether to sync the managers from Google Workspace or use a local one.
- You must choose between two options: (1) Sync by users, or (2) Sync by groups.
- Under the “Action” Column, users show as “Skipped” or “Syncd“. Click either word to switch users between “Skipped” or “Syncd”.
- Click “Sync Now” to synchronize users manually. Users auto-sync every 4 hours.
- Click on Close.
High Compliance Tip:
The video below shows you how to accomplish these steps as well as how to set up managers for each user.
Defining managers for each employee in CyberHoot is very important. Employee managers are Carbon Copied (CC’d) on reminder emails sent to employees. This only happens when an Employee has not completed an assignment by the due date.
This short video shows how to set up Google Workspace sync in CyberHoot for the Power Platform.
https://www.youtube.com/embed/entho13wHLk?si=ujNHt3CMCD1I2huM
What are the permissions used by CyberHoot to access Google Workspace? Does CyberHoot store my password?
Permission Authorization flow:
Step 1- Permission and Consent: Administrator logs into Google and CyberHoot is assigned read-only permissions using the principle of least privilege, assigning the permissions listed below.
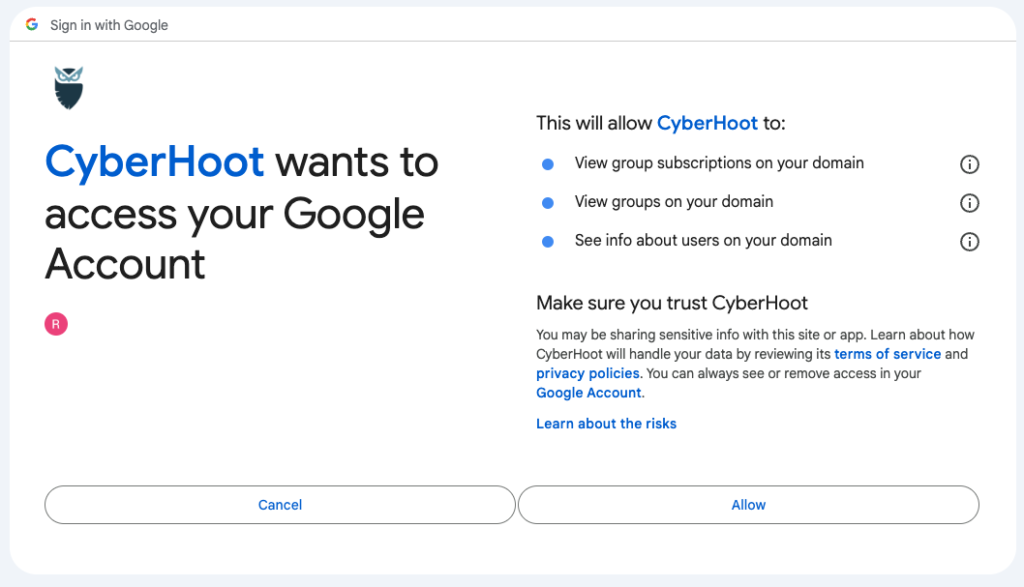
Step 2 – Token Acquisition: CyberHoot requests an OAuth 2.0 token from Google Workspace. Note that CyberHoot will not know nor store the password used by the admin.
Step 3 – Token Grant: Google validates the request and, if successful, issues an access token. This token encapsulates the permissions granted to CyberHoot.
Step 4 – Accessing Resources with the Token: CyberHoot uses this token to access the information on the table above. This information is used to add users to CyberHoot.
Related Articles
HowTo: How to Add Users via Google Workspace Sync on the Autopilot Platform
Adding users to CyberHoot’s Autopilot Platforms via Google Workspace Sync If your company uses Google Workspace, you can use it as a simple and effective way to manage users within CyberHoot. Follow the steps below: Instructions for Autopilot ...HowTo: How to Archive Users via Azure Sync (Entra ID) on the Power Platform
Archiving users on CyberHoot’s Power Platform via Azure AD Sync (using Graph API) If your company uses Microsoft Azure, you can use it as a simple and effective way to manage users within CyberHoot. Follow the steps below to archive Azure users: ...HowTo: How to Add Users via M365 (Entra ID) on Power Platform
Adding users to CyberHoot’s Power Platform via Azure AD/ Entra ID Sync (using Graph API) If your company uses Microsoft Azure / Entra ID, you can use it as a simple and effective way to manage users within CyberHoot. Follow the steps below: ...HowTo: Integrate CyberHoot with SyncroMSP (Power Platform)
This guide walks you through setting up and managing the CyberHoot–SyncroMSP integration using the CyberHoot Power Platform. 1. Generate API Token in Syncro MSP: Go to your login name > Settings > API Tokens. Click "Add New Token". Click on "Custom ...Power Platform Administration Overview
Welcome to the CyberHoot Power Platform: A Guided Tour for New Administrators Starting with a new platform can feel like a big lift, but we are here to make it easy. This page features a collection of short overview videos designed to help you get ...